TypeScript and Webflow: A Winning Combination for Smarter Development Workflows

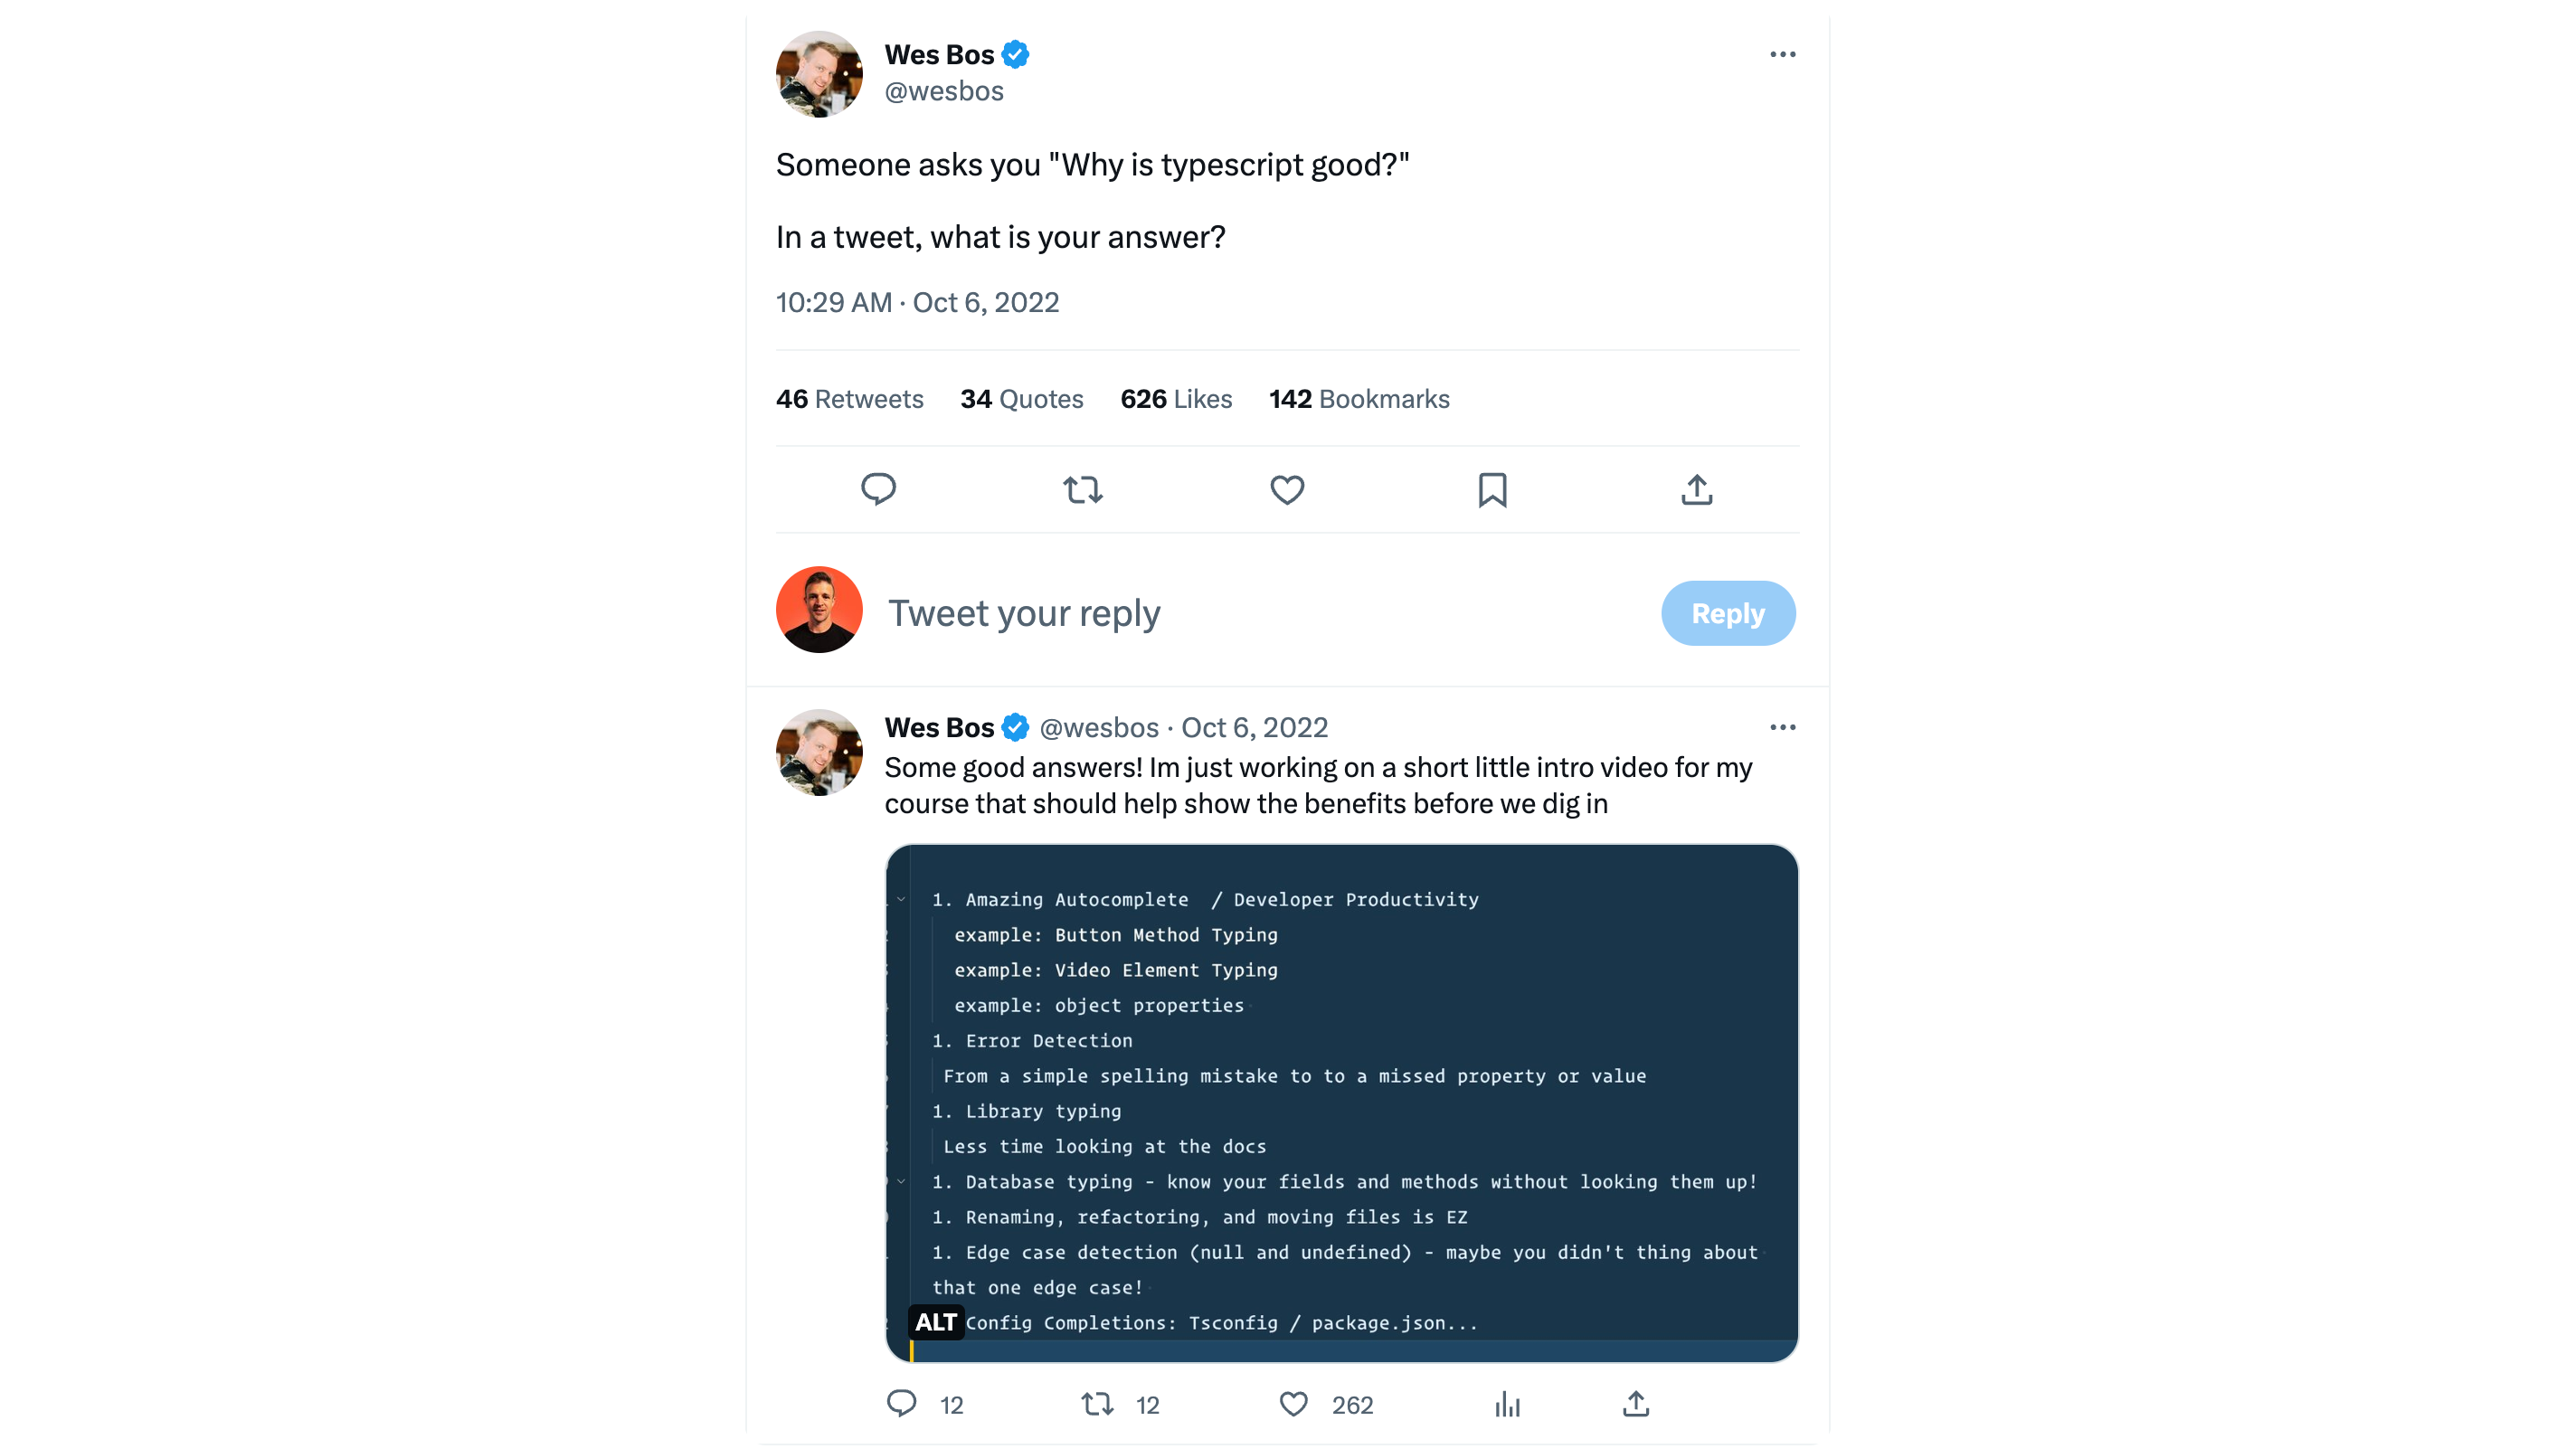
JavaScript devs - Want to learn a simple way to catch mistakes in your code before runtime, have better intellisense (autocomplete), and generally be more confident with code you are shipping? It's time to level up your game with TypeScript! TypeScript is taking the coding world by storm, and for good reason. It supercharges JavaScript with static types, making your code more robust and easier to maintain. Get ready to find bugs before they bite and boost your productivity like never before. In this article, we'll take a look at how you can implement Typescript into your workflow by setting up a p5.js project to run in Webflow built with Typescript. TypeScript is winning the hearts of developers everywhere. Don't get left behind – join the TypeScript revolution today!
The best part about Typescript is that you can start using it right on top of your plain old Javascript. If you’re just starting, don’t worry too much about modifying your existing code to add types or anything like that. Just write your regular Javascript, then read and learn from Typescript warnings/errors as you write. Solving these Typescript errors will better protect your code from runtime exceptions (no more Uncaught Error: undefined is not an object) and teach you better coding practices as you go.
When I was starting with Typescript, there were a few things I wish I knew about setting up development environments that would have been handy to know before getting started. In particular, we need to learn a little bit about how to compile Typescript down to Javascript (that the browser knows how to execute), how to use a code bundler (we’ll use esbuild), and how to use a package manager (we’ll use NPM, or Node Package Manager).
If you’ve always been writing your code in Webflow or CodeSandbox, then you’ll need to make sure you have a few things before getting started.
- Node.js - Node.js is a javascript runtime that you can runs on your local machine. It allows us to execute Javascript code in Windows or Mac OS without our browser. We won’t actually be executing code with Node in this tutorial, but it’s good to have and ships with npm, which we will need to manage our packages.
- Code Editor - The code editor is where we will write our code on our local machine. I use Visual Studio Code but there are lots of other options like Sublime Text or VIM.
Before getting started, you can verify you have npm installed by typing npm -v.

Starting Code
Let’s assume that we have a basic p5.js sketch already in Webflow or CodeSandbox that we want to move from Webflow’s code editor to our local development environment where we will use Typescript.
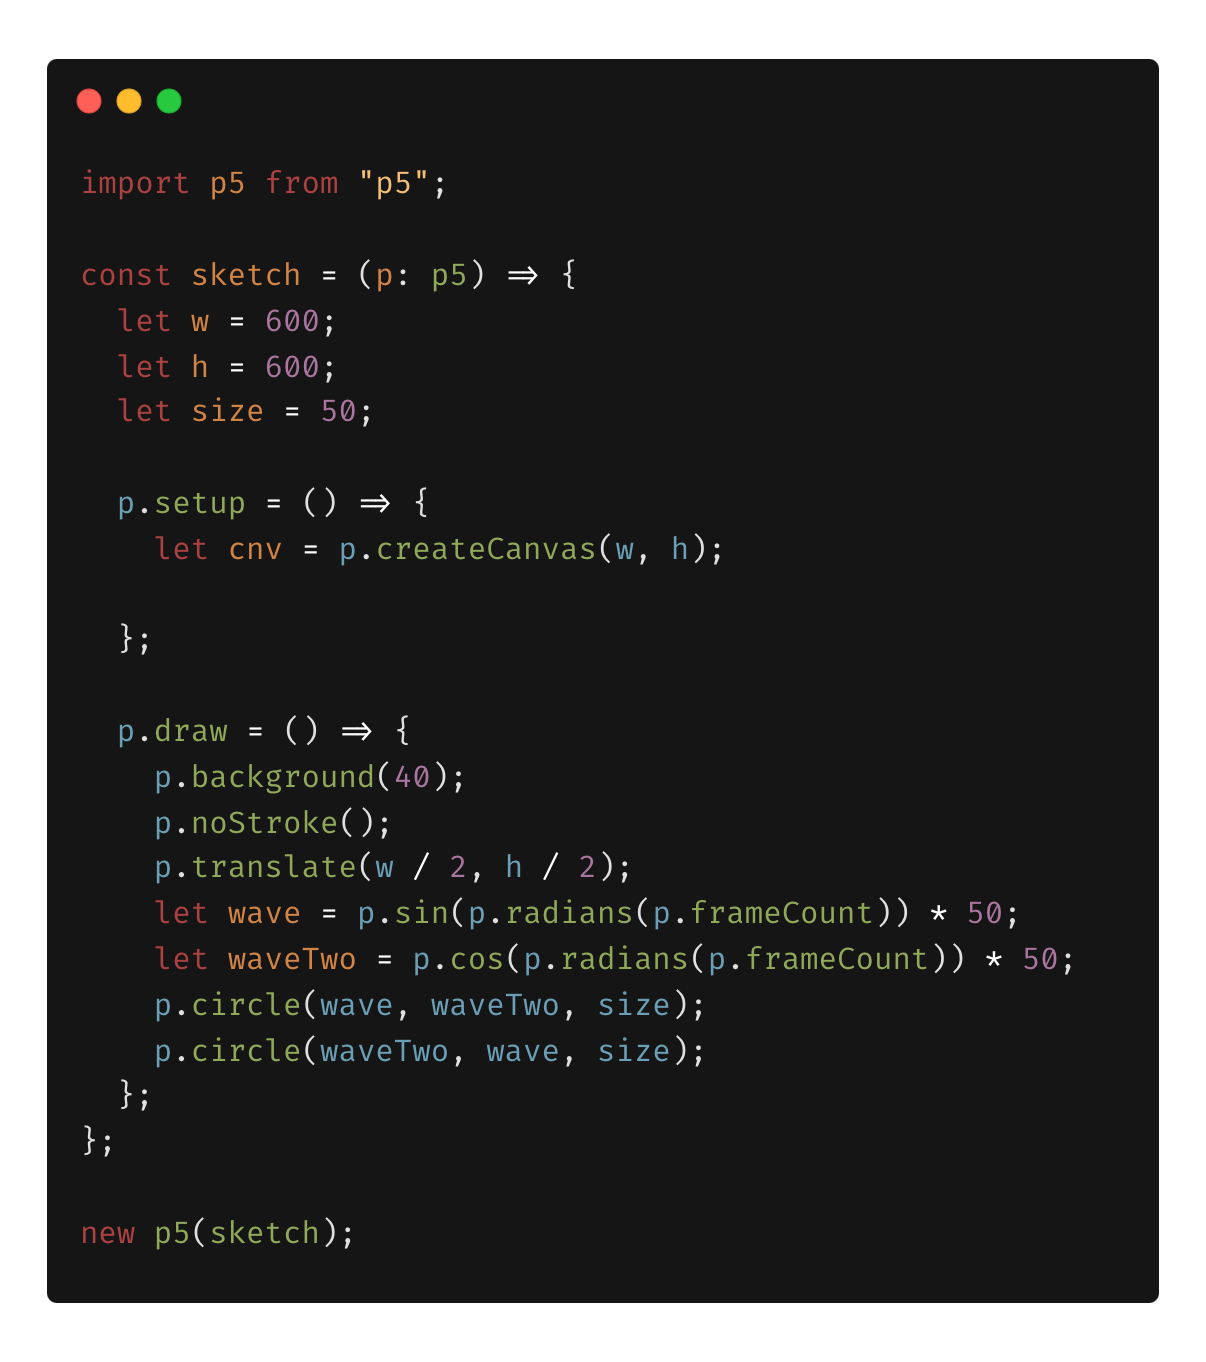
Here's the block of code we will be working with.
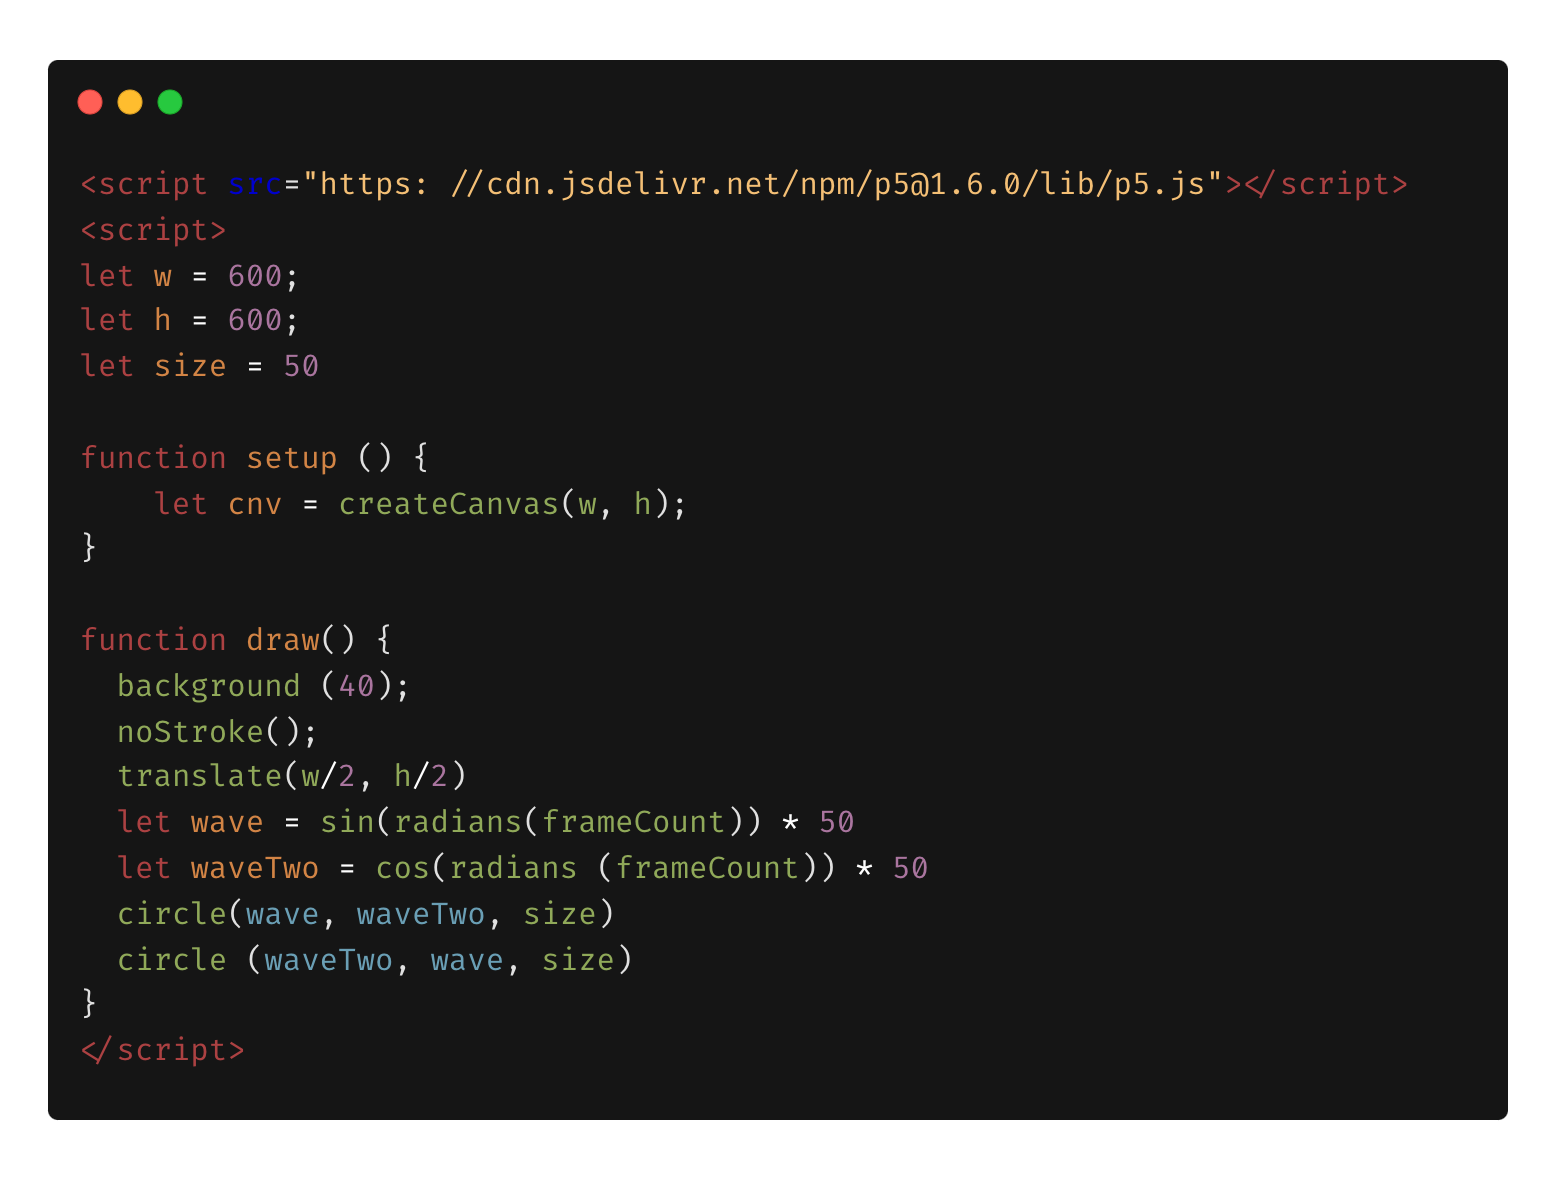
If you aren’t too familiar with p5.js, here’s a rundown of what’s going on in this code.
- First things first, we need to set up our canvas. We're going to create a square canvas with a width (w) and height (h) of 600 pixels. We're also defining a variable size that will be used later to determine the size of our circles.
- The setup function is a special p5.js function that runs once at the beginning of our program. Inside this function, we use the createCanvas function to create our canvas with the specified width and height.
- The draw function is another special p5.js function that runs continuously, creating an animation loop. Inside this function, we start by setting the background color to a dark gray using the background function. The argument 40 represents the grayscale value (0 is black, 255 is white).
- We also use noStroke to remove the outline from our shapes. And here's a neat trick: we use translate to move the origin of our coordinate system to the center of the canvas. This way, when we draw our shapes, they'll be centered!
- Now, here's where the magic happens! We're going to create two wavy circles that move in a circle in opposite directions.
- We start by calculating two wave values using the sin and cos trigonometric functions. We use radians(frameCount) as the input to these functions, where frameCount is a p5.js variable that keeps track of the number of frames that have been drawn. By multiplying the result by 50, we control the amplitude of the wave.
- Next, we use the circle function to draw two circles. The first circle's x-coordinate is determined by wave, and its y-coordinate is determined by waveTwo. The second circle's x-coordinate is determined by waveTwo, and its y-coordinate is determined by wave. The third argument to the circle function specifies the diameter of the circles, which we set to size.
🎉 And voilà! We've created a beautiful piece of circle art! 🎉
As the draw function loops, the frameCount variable increases and the sin and cos functions create a harmonious circular path which the two circles follows, and the result is a simple animation.
But back to business...
Run Code from our Local Computer on the Published Webflow Site
Reference screenshots below for steps 4, 5, and 7.
- Create a new folder where you like to save code on your computer. For this example we can just create a folder on the desktop called p5-typescript
- In Visual Studio Code, click on “Open Folder” in the File menu, and select the folder we created in step 1.
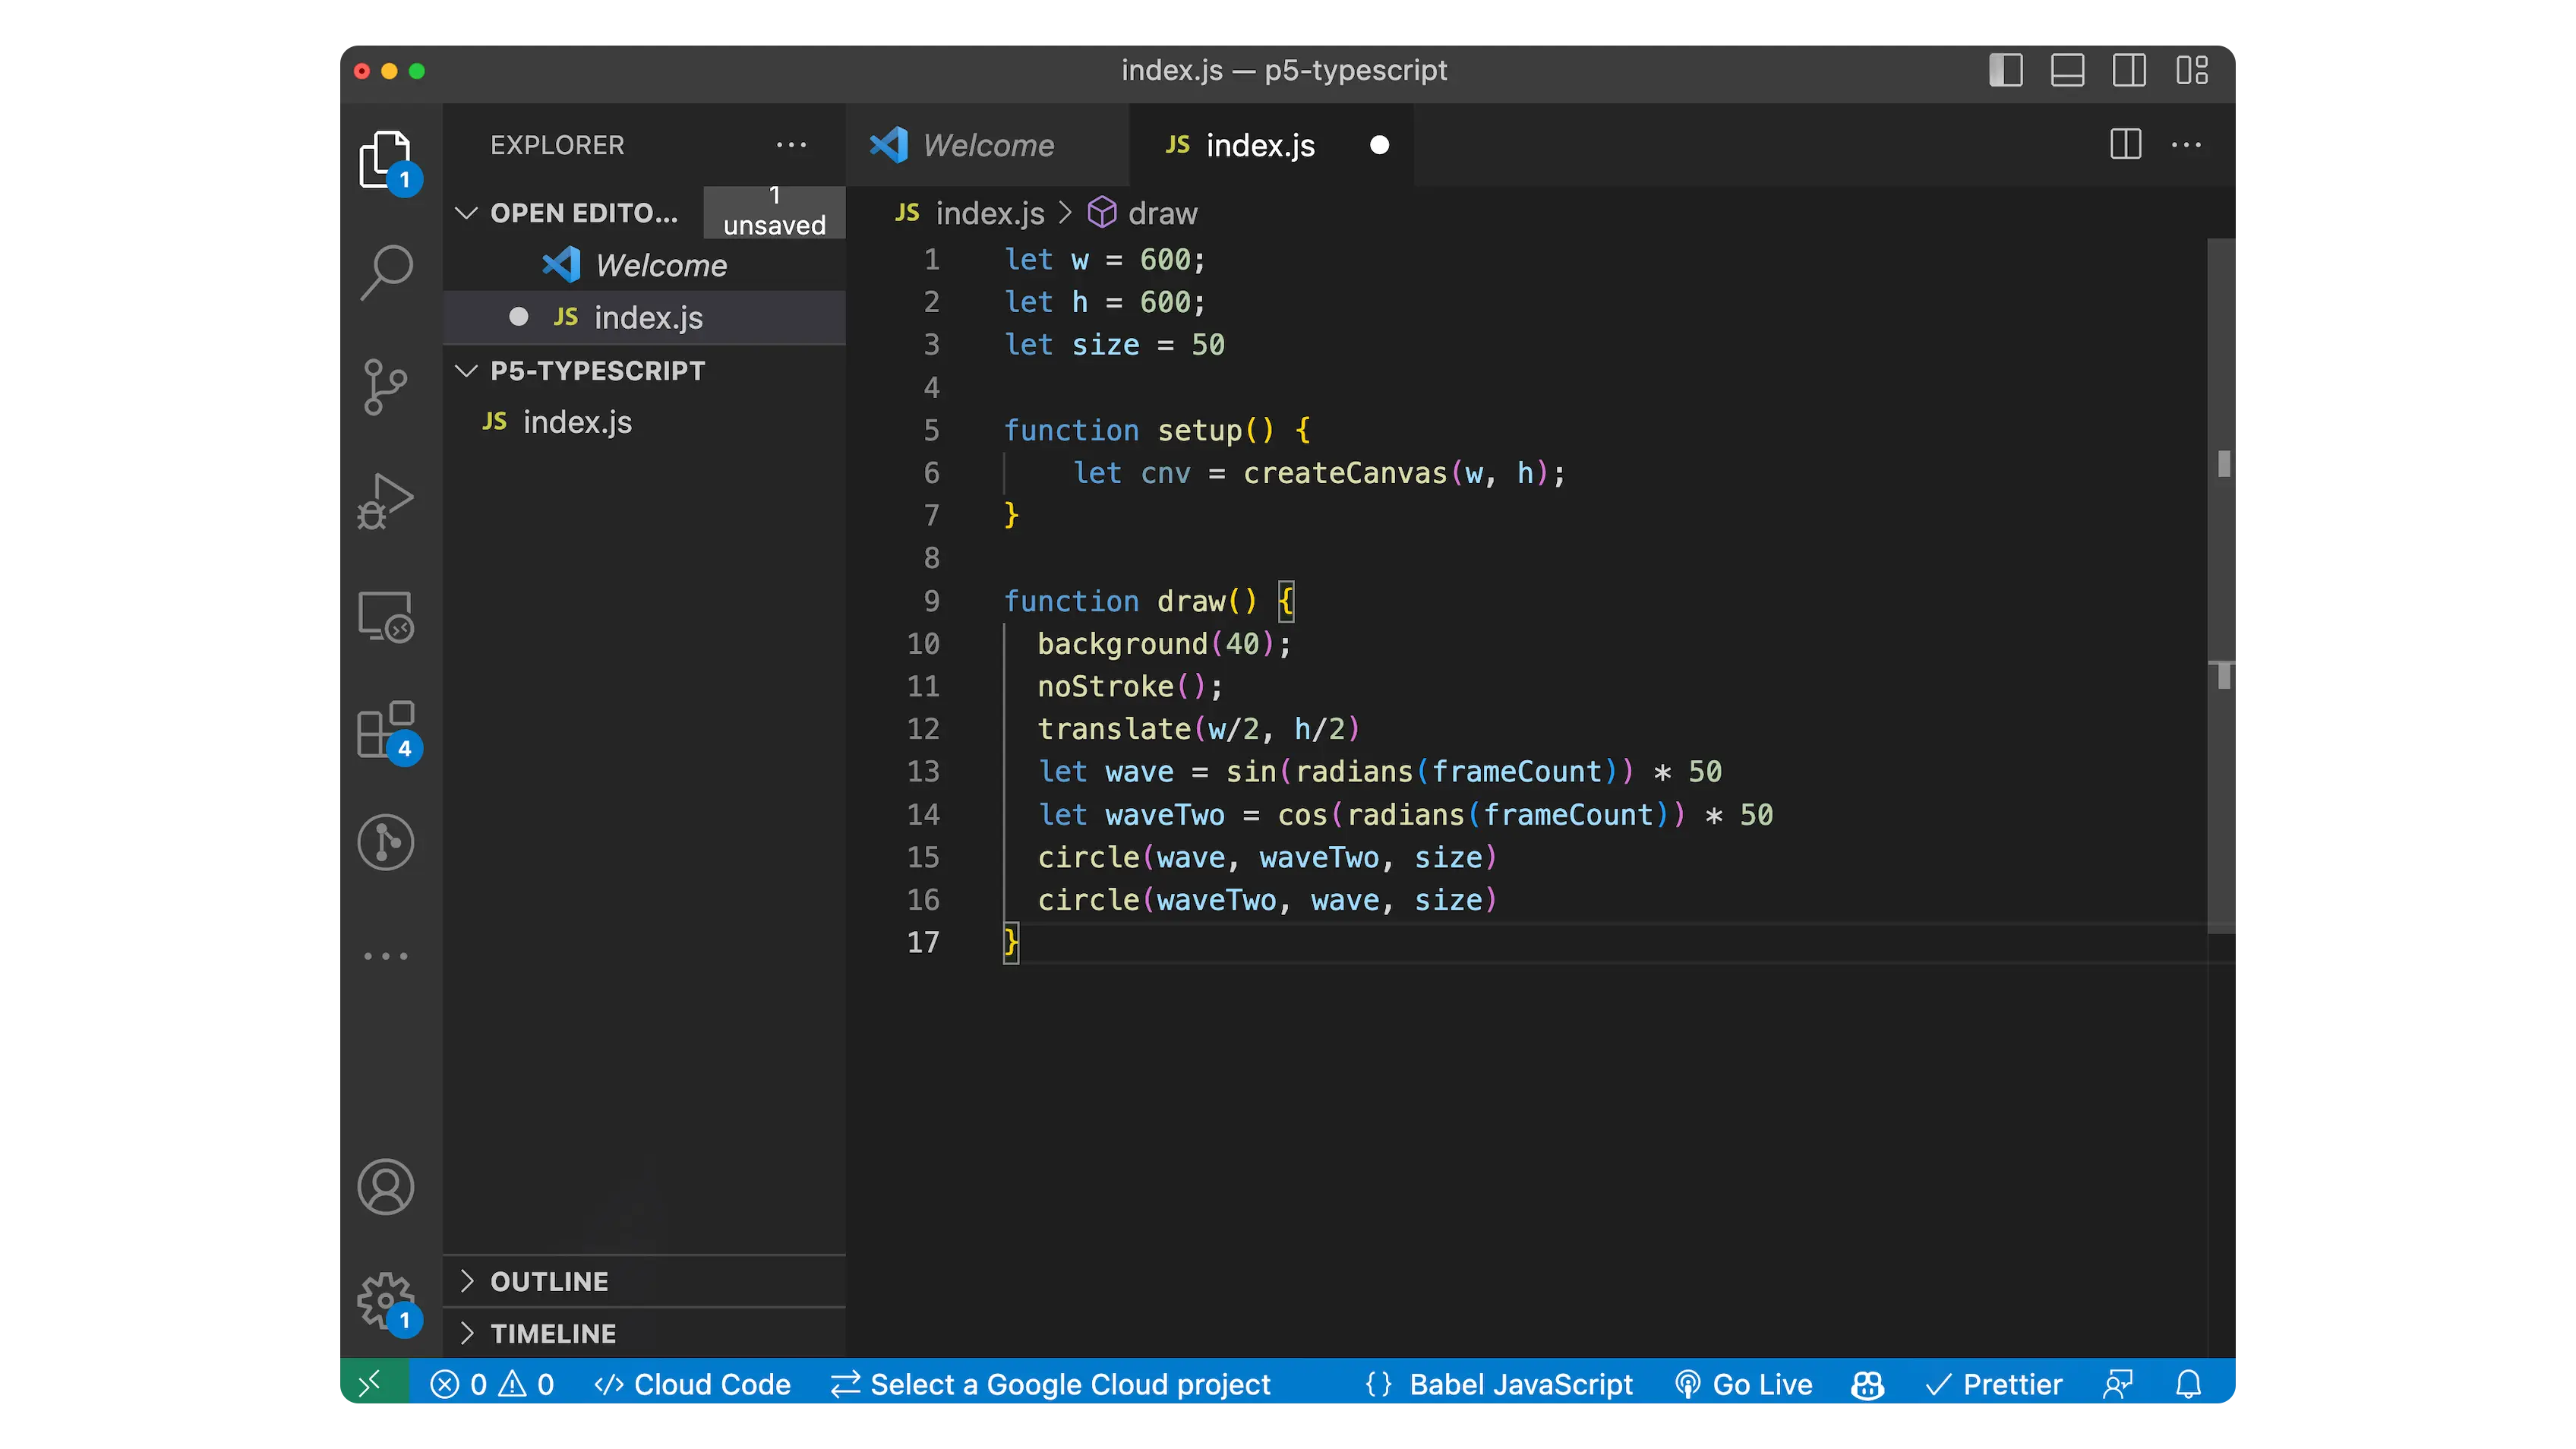
- Create a new file by right clicking in the explorer window and call it index.js.
- Copy just the Javascript code (everything between the second set of <script> tags) from the Webflow project into index.js.
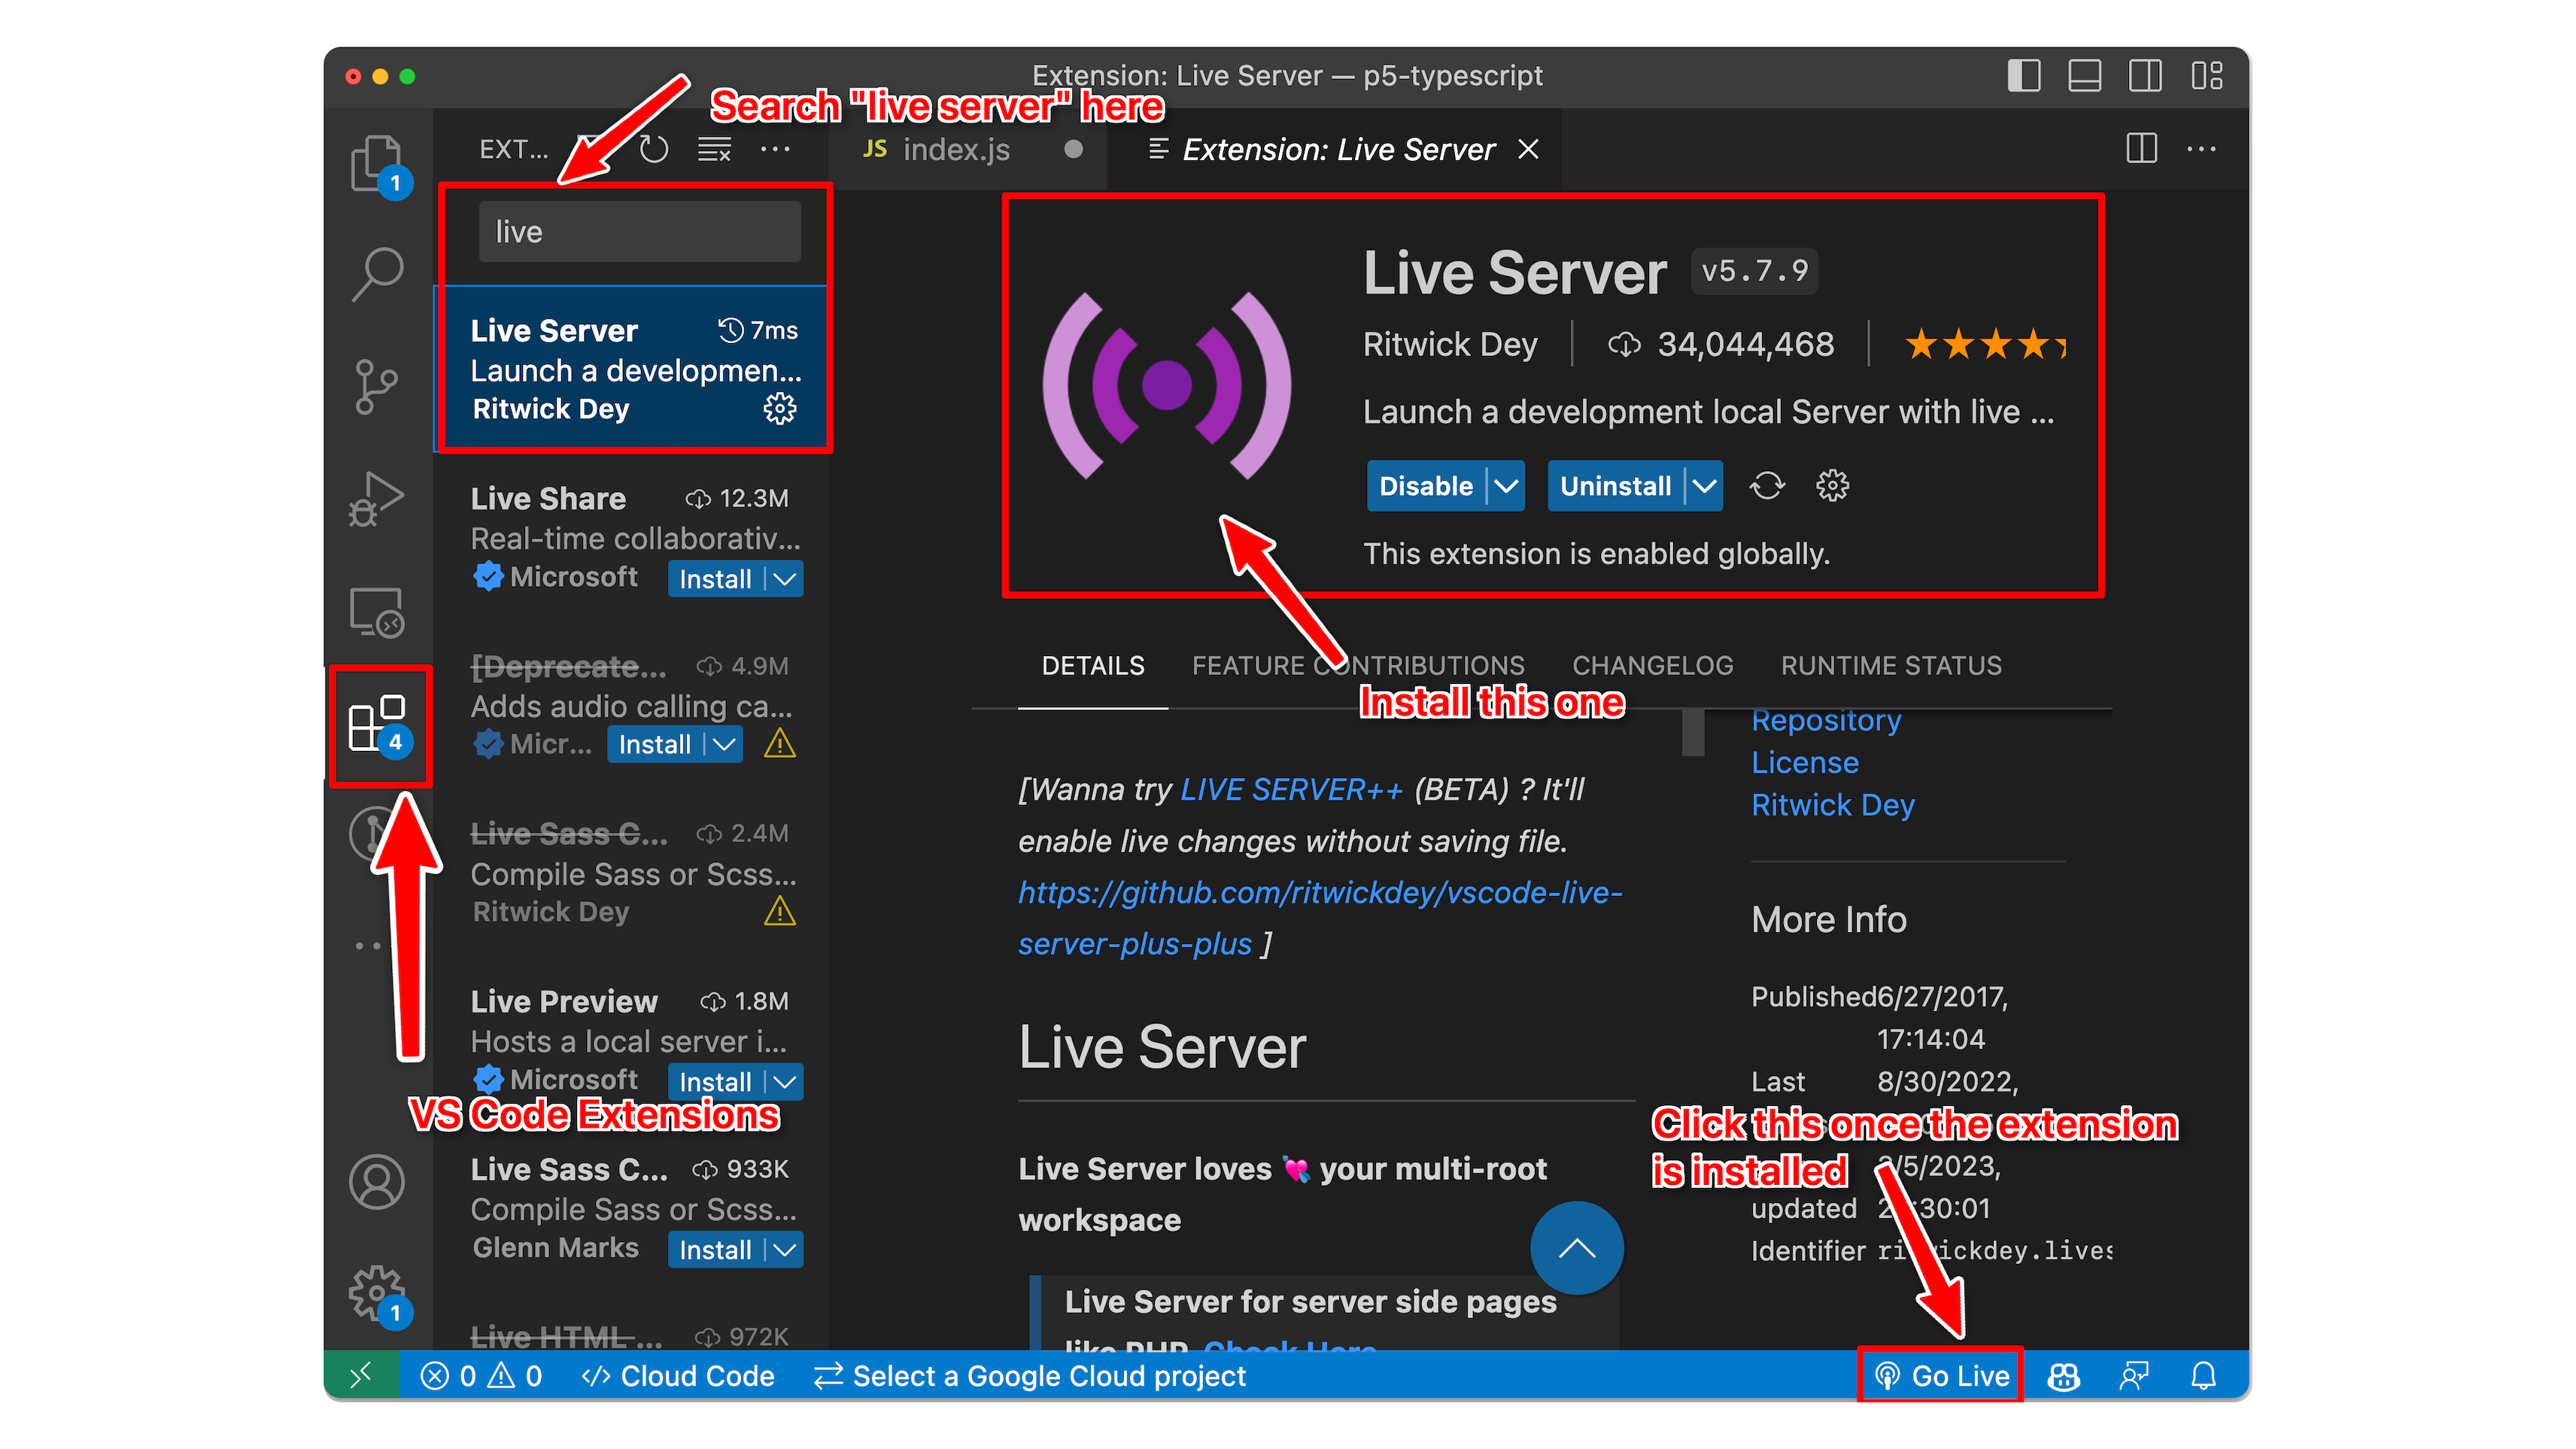
- Make sure you have the VS Code Live Server Extensions Installed and Click “Go Live” down at the bottom blue bar.
- When you click “Go Live,” Live Server will start a local server on port 5500. If you put http://127.0.0.1:5500/ in your browser and click enter we’ll see our code being hosted locally.
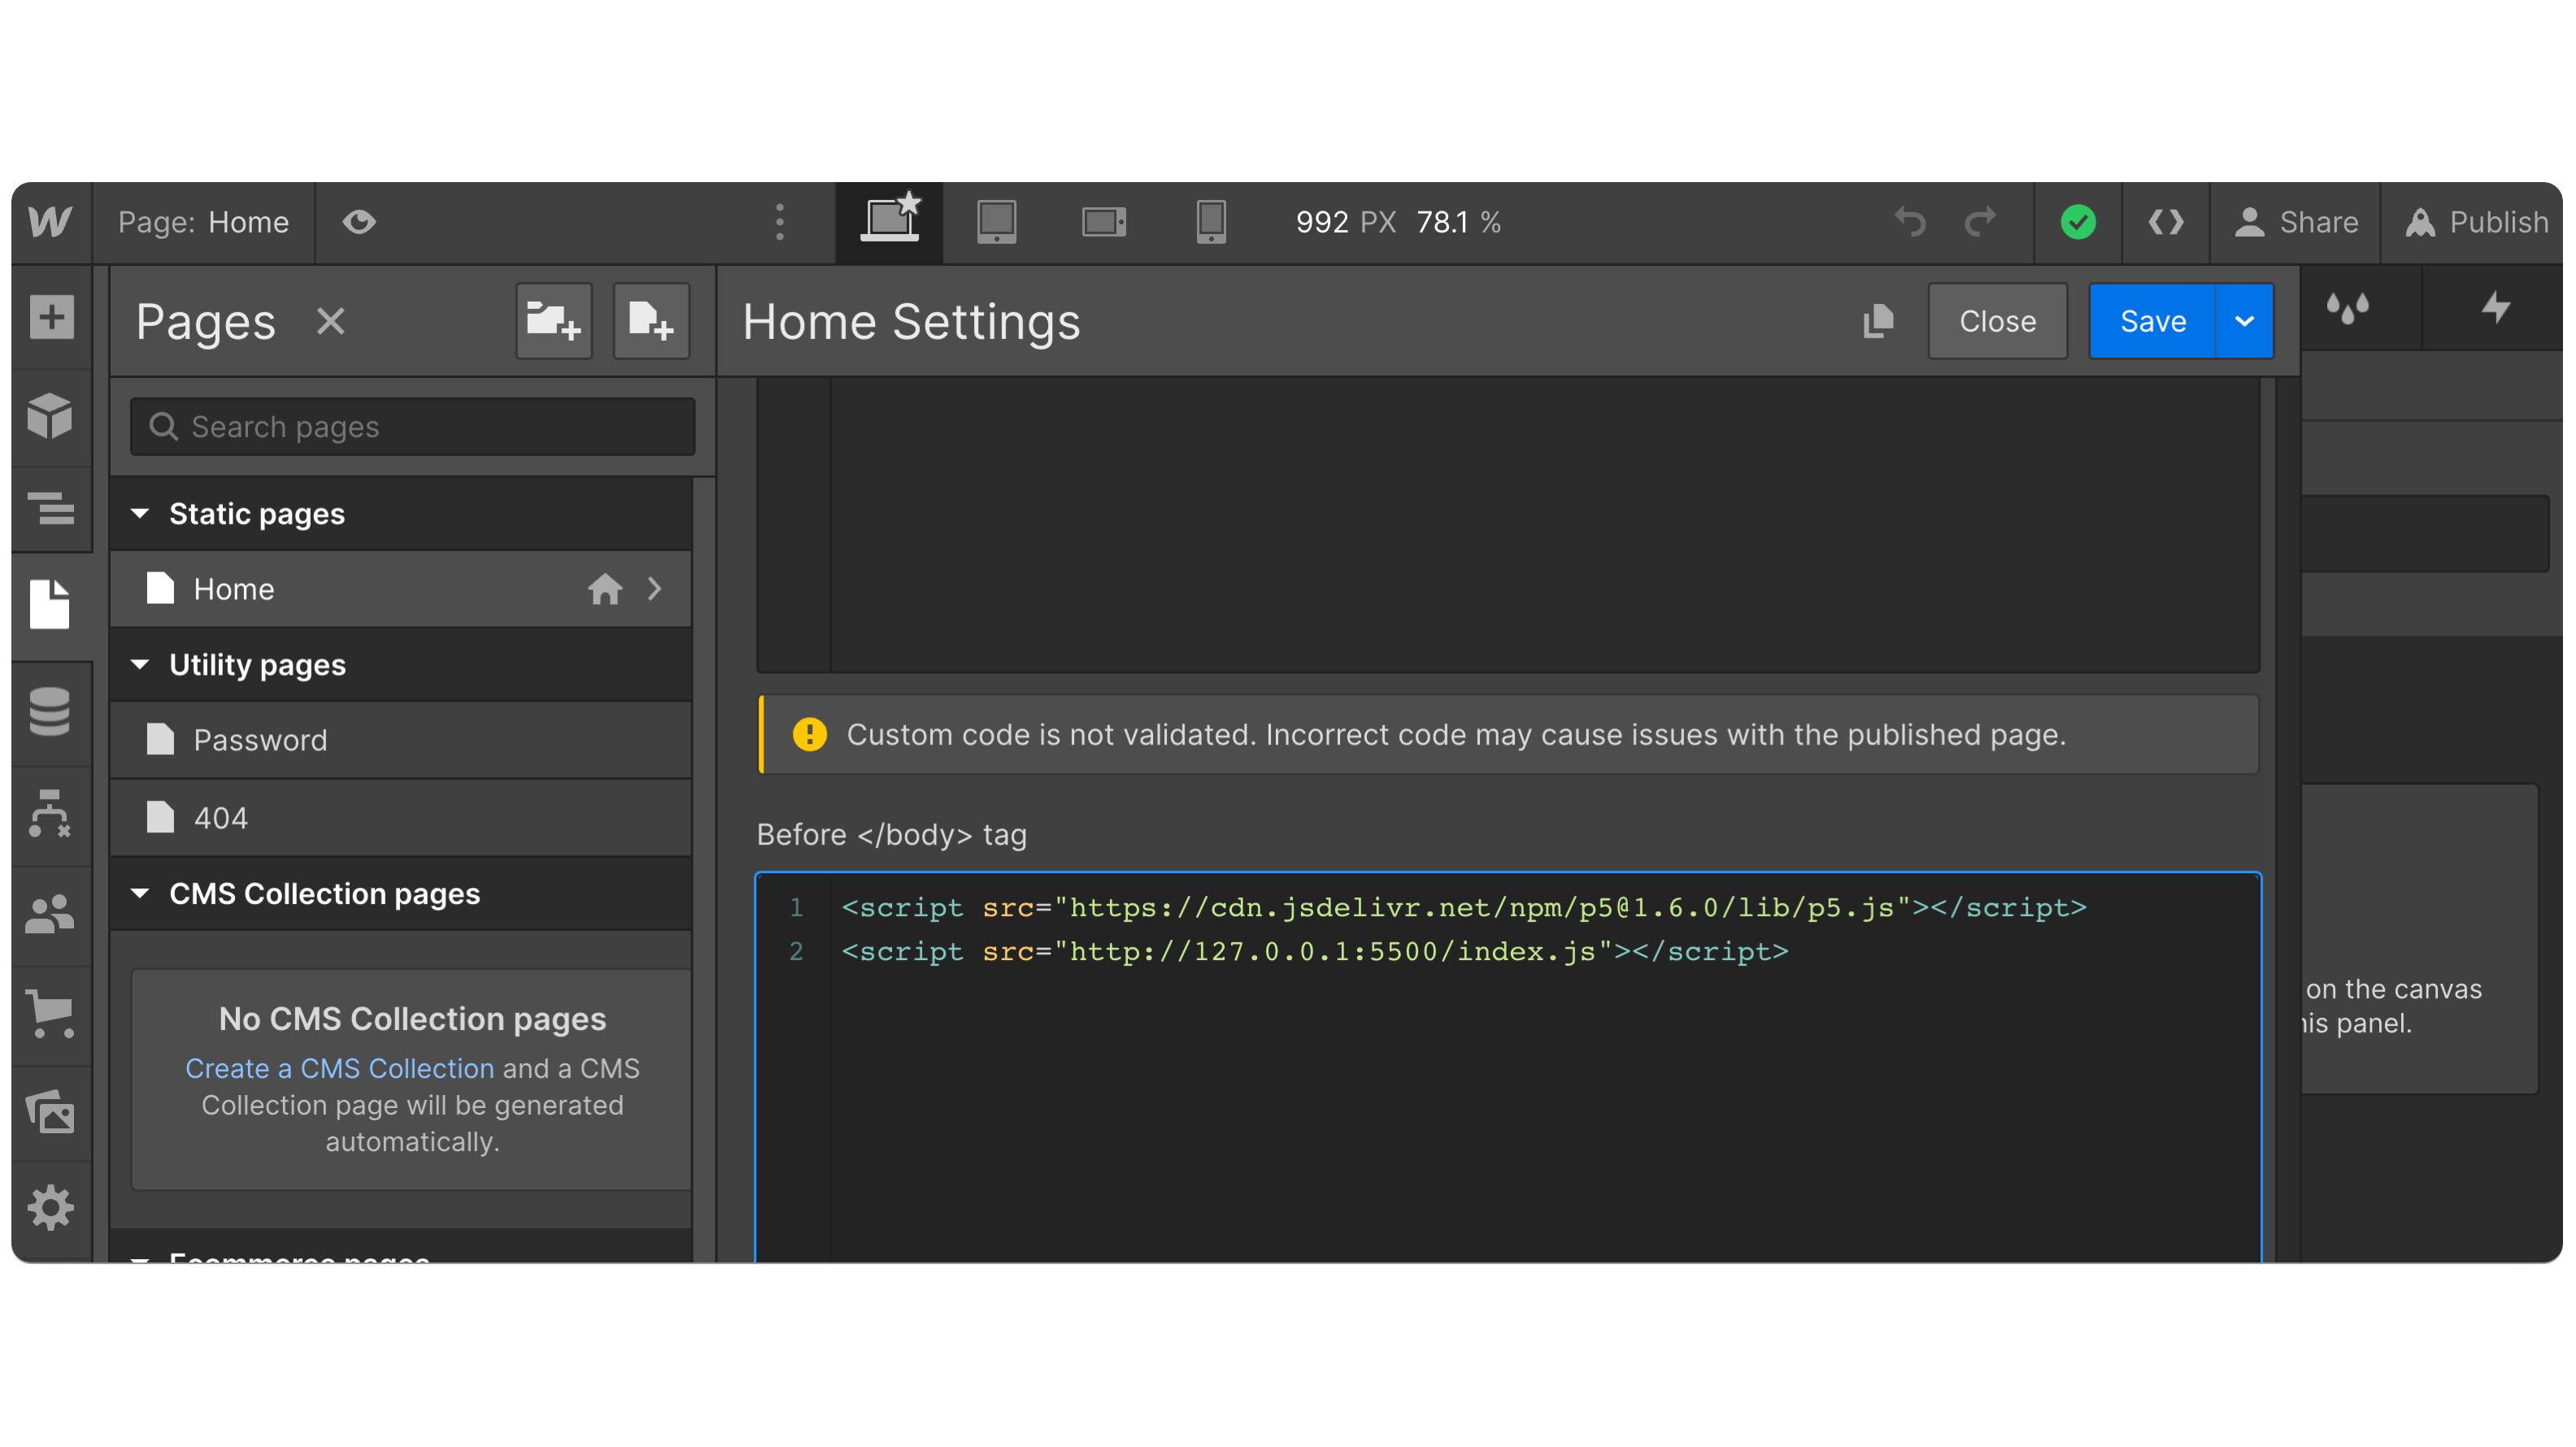
- In Webflow, let’s remove our Javascript code and point to the code being hosted on our personal computer. Delete the second set of script tags and create a new script tag that points to this code with `<script src="http://127.0.0.1:5500/index.js"></script>`. Webflow should look like this now.
- Save and publish, and verify that our code is running as it was before.
☝️ Important note! Since our code is no longer hosted by Webflow, the code will only run when we view the website on this computer. The IP address "127.0.0.1" is known as the "loopback address" or "localhost." It is a special IP address used by a computer to refer to itself. In other words, when a computer communicates with the IP address 127.0.0.1, it is actually communicating with itself. If you run this website on a different computer, then 127.0.0.1 is likely NOT serving code on port 5500, so the console will output a 404 error file not found.
Initialize NPM
- Open up a terminal session in VS Code from the `Terminal` menu and click `new Terminal`
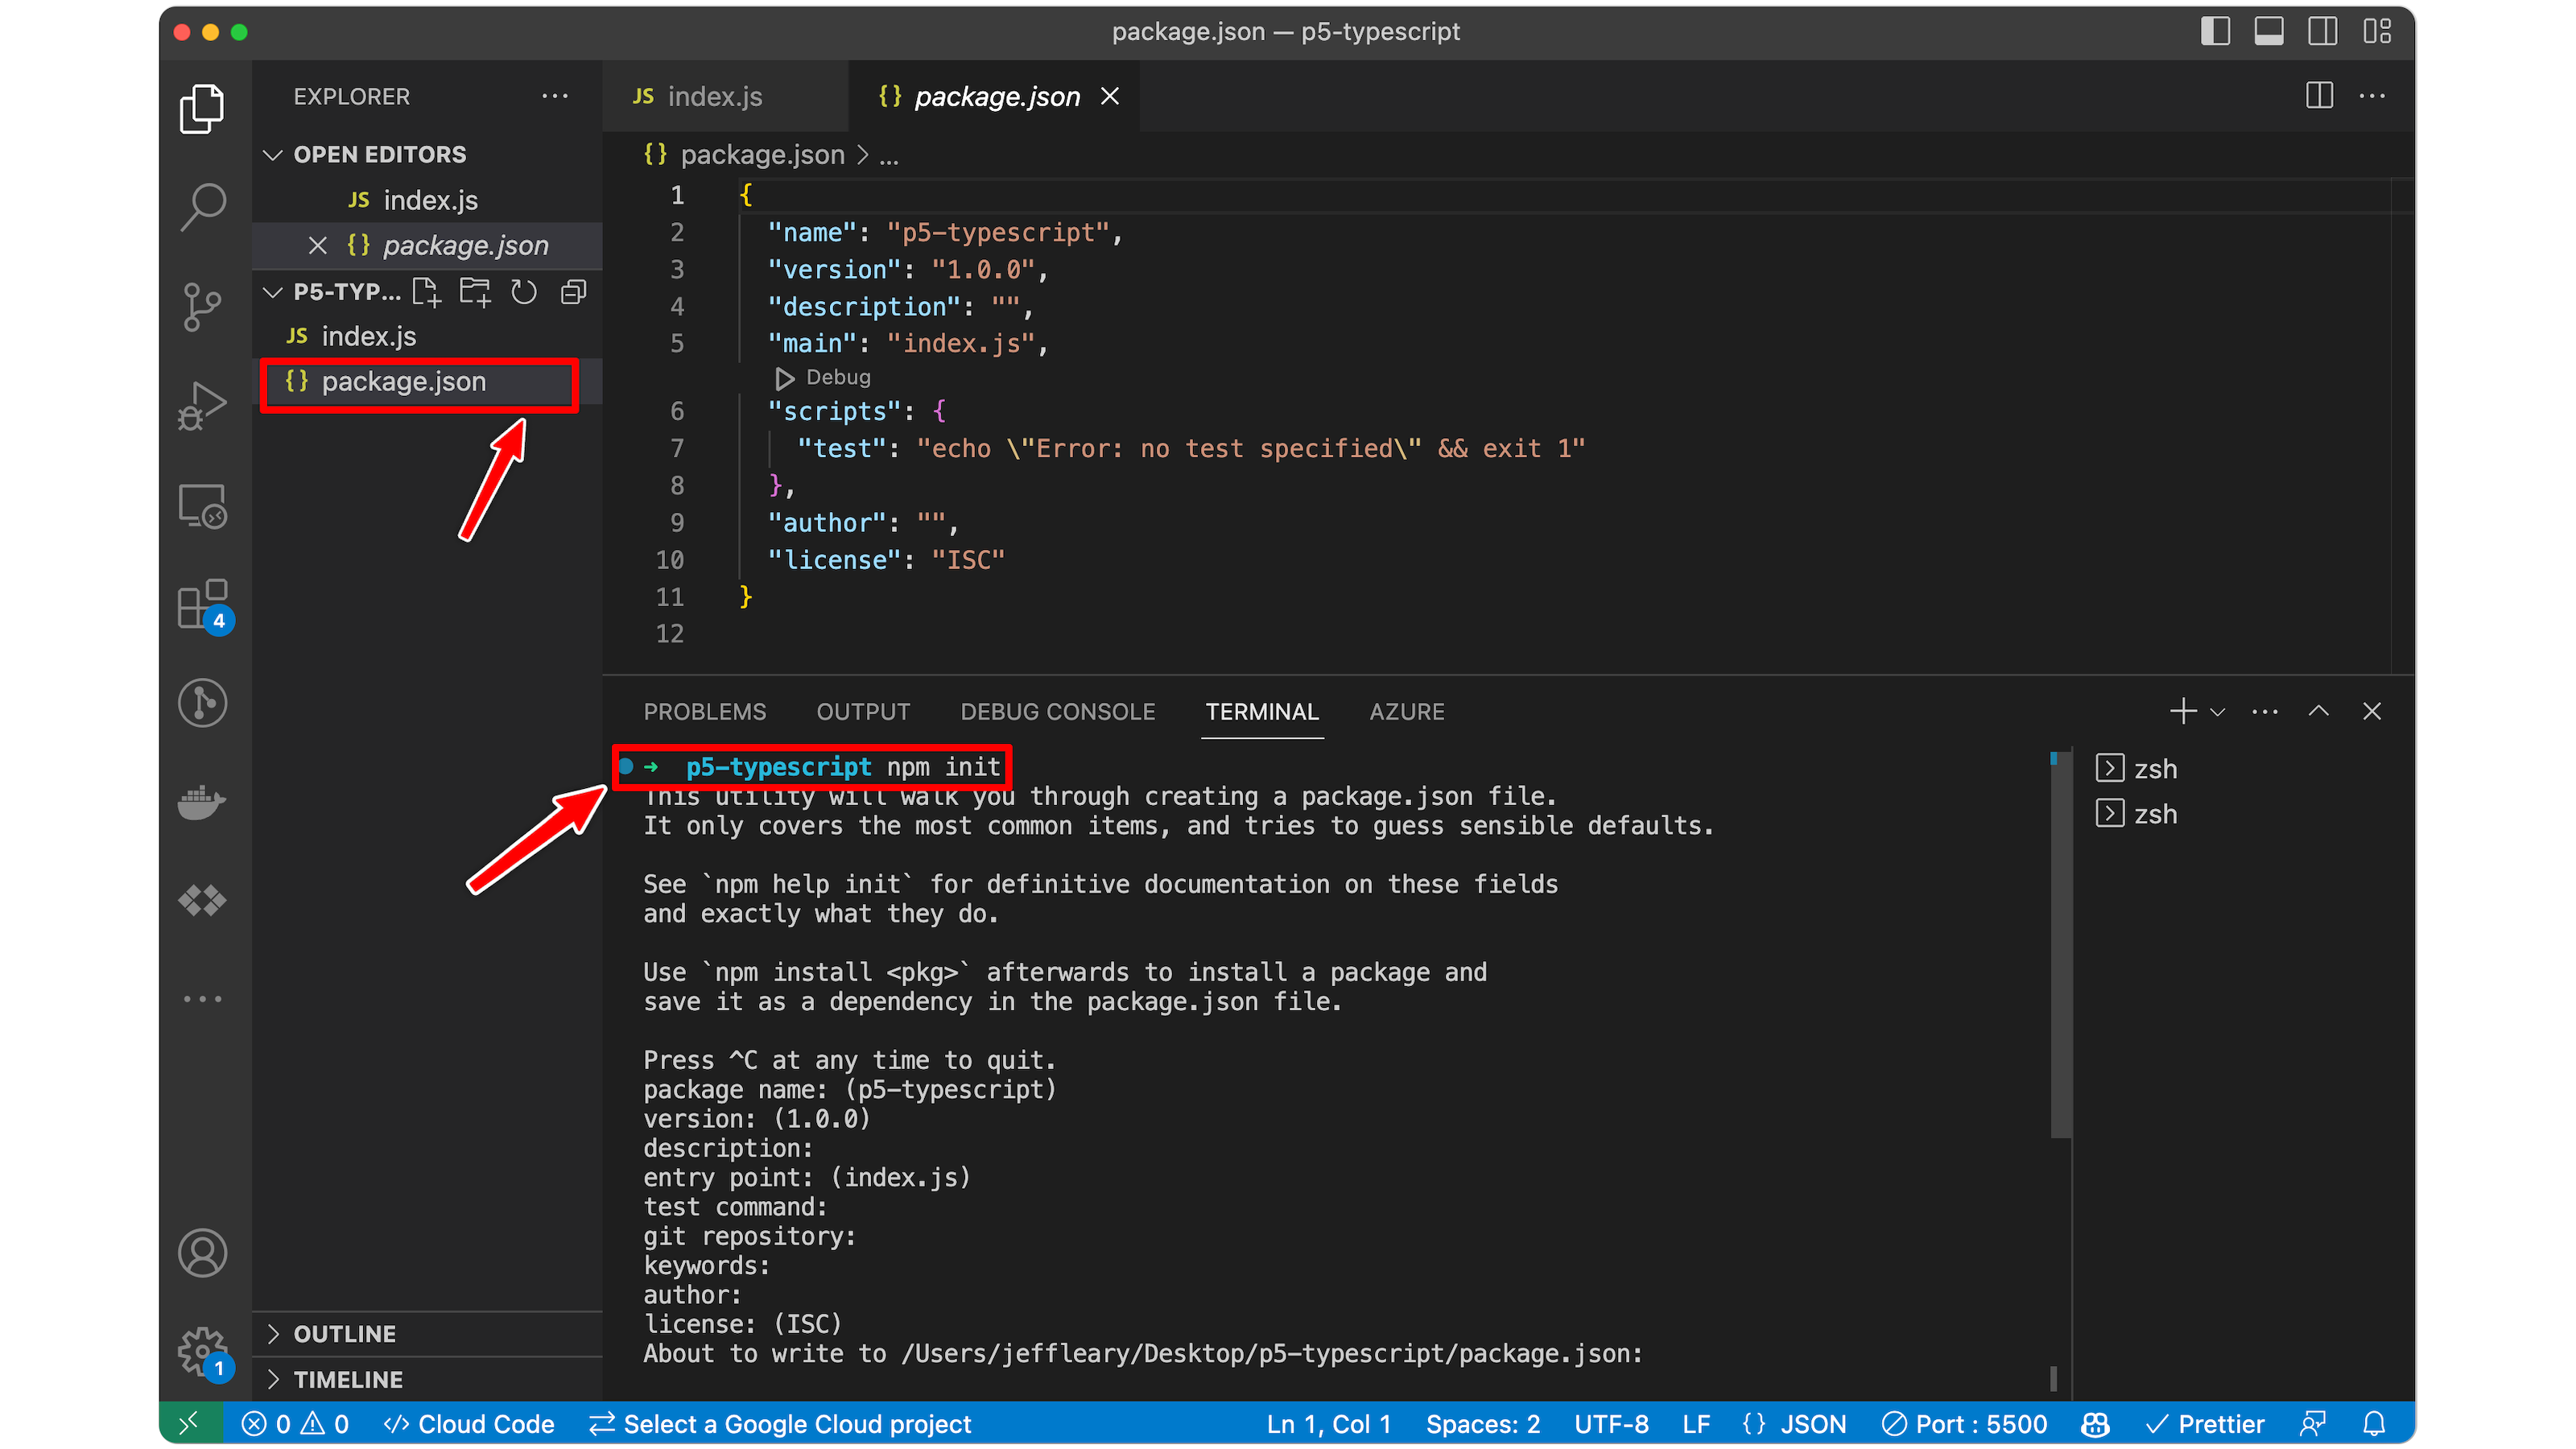
- Initialize npm for this project by typing npm init.
- Keep pressing enter to initialize npm with all the default settings (we can always change these later). When complete you should see a new file in explorer called package.json.
With npm installed, we can now install packages in our local project! Let’s start with p5.js.
Installing Packages with npm
- In the VS Code terminal type npm install p5. This will create a folder called node_modules in our project, which includes all the code required for p5.js. You’ll also see a package-lock.json file appear in the explorer.
- At the top of index.js, type import p5 from “p5”.
We’ve added p5 to our local project and imported it to index.js, but we need to be careful here! I see folks think they can delete the p5.js script import in Webflow now, but we’ll have some problems if we do that! Let's take a minute to explore what happens so we can better understanding what bundlers do for us.
Immediately, we’ll get an error in console: Uncaught SyntaxError: Cannot use import statement outside a module.
This error message typically occurs when you are using an import statement in a JavaScript file that is not being treated as an ECMAScript module by the browser. The import statement is part of the ECMAScript module syntax, and it can only be used in files that are explicitly defined as modules.
If you’ve used Node.js before, you may be familiar with CommonJS require syntax. The require syntax is commonly used in a Node.js environment but is not natively supported in browsers. If you're working in a Node.js environment or using a bundler like Webpack or Browserify that supports CommonJS modules, you can use require to load the p5.js library. However, if you're working directly in a browser environment without a bundler, you won't be able to use require.
If we add the type=”module” attribute to our script tag, we’ll get another error! Uncaught TypeError: Failed to resolve module specifier "p5". Relative references must start with either "/", "./", or "../".
The browser cannot find the code to run p5.js because we are only telling Webflow to load 127.0.0.1:5500/index.js. We can try to point directly to p5 inside our node_modules folder and load the code that way, but this is a messy and inefficient way to accomplish our task.
Adding our bundler, esbuild!
Let's take a look at the features listed on the esbuild website.
Major features:
- Extreme speed without needing a cache
- JavaScript, CSS, TypeScript, and JSX built-in
- A straightforward API for CLI, JS, and Go
- Bundles ESM and CommonJS modules
- Tree shaking, minification, and source maps
- Local server, watch mode, and plugins
The module bundling, Typescript support, and local server features are very useful for us right now, and the others will become more useful as we get more used to working with bundlers.
- In terminal type npm install -D esbuild. The -D specified that this is a development dependency. This means the package is needed for our local environment but not in our production environment. The esbuild package is something we need at compile time, but not at run time. By making it a development dependency, we can avoid shipping extra code that is not needed.
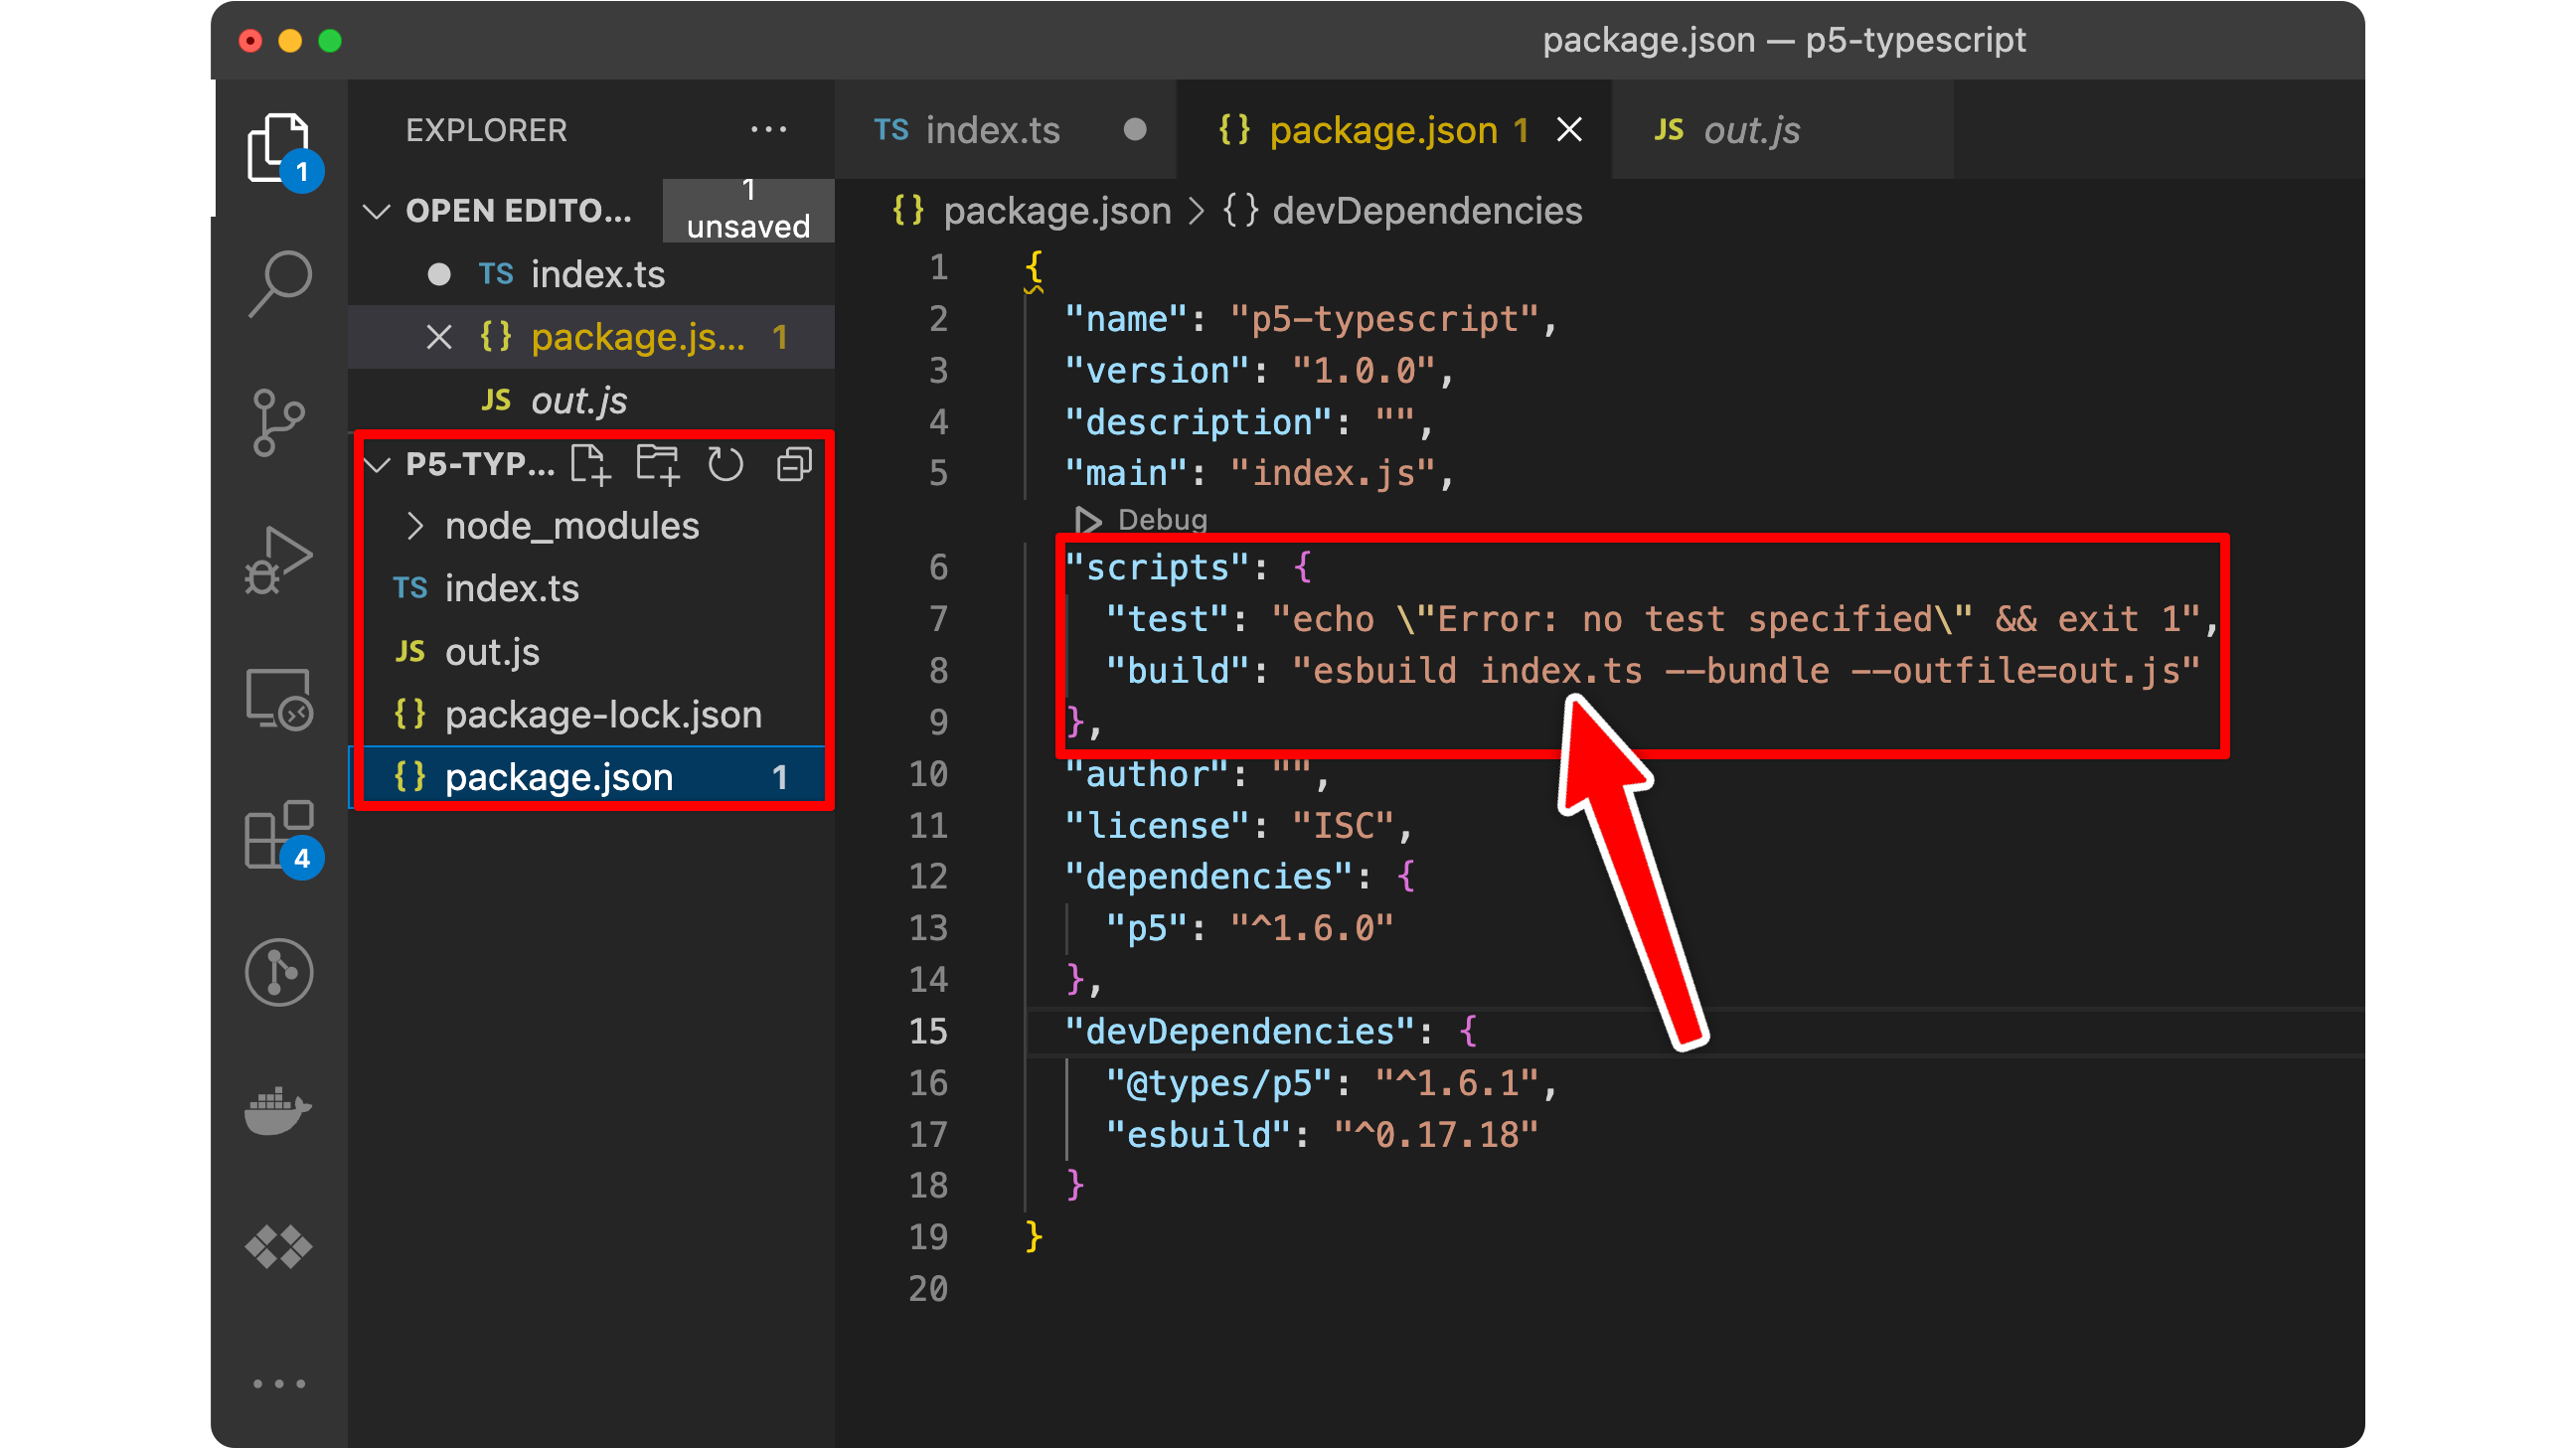
- In package.json, add the following key/value pair to the “scripts” object: "build": "esbuild index.js --bundle --outfile=out.js".
- In terminal type npm run build. We will see a file called out.js be created. Inspecting this file, it contains not only all the code for p5.js, but also our sketch code! It’s all bundled up in one!
- Unfortunately, if we change our script src attribute in Webflow to look at http://127.0.0.1:5500/out.js instead of http://127.0.0.1:5500/index.js, our code still wont work. Why is that?
Since we have switched over to ECMAScript modules and bundlers, we need to shift our code from global mode to instance mode. When importing p5.js via CDN, it made the setup() and draw() available in the global window object. This is fine for beginners and short sketches, but introduces problems if we want multiple sketched on our website or start using other libraries that could add setup() and/or draw() functions to the global namespace.
A much better practice is to protect the global namespace by wrapping our code in a custom function. When using ECMAScript modules and accompanying import statements with esbuild, we need to modify our code a bit.
In terminal, type npm run build again to recompile and bundle our code as out.js. Go check our live website and you should see the sketch running as it was before! Progress!
What about Typescript?
It’s super easy to take advantage of Typescript now with esbuild!
- Change index.js to index.ts - Now it’s a Typescript file!
- In package.json, change our build command to compile index.ts to out.js (not index.js which doesn't exist anymore). Package.json should look like it does below.
- Type npm run build in terminal again. Esbuild automatically recognizes our typescript file and comiles it down to Javascript, which the browser knows how to read and execute.
We Have a Typescript Environment, but aren’t actually leveraging Typescript yet.
See two little dots on our import statement? Typescript is trying to tell us something. It’s looking for types, but cannot find any. Types will help us get better autocomplete and code protection, so let’s add those. If we click Quick Fix… we have an option to install @types/p5 as a development dependency. Before that, Typescript doesn’t know what p5 is, and assigns it the any type, which isn’t all that useful. We could also install the types manually in terminal by running npm install -D @types/p5.
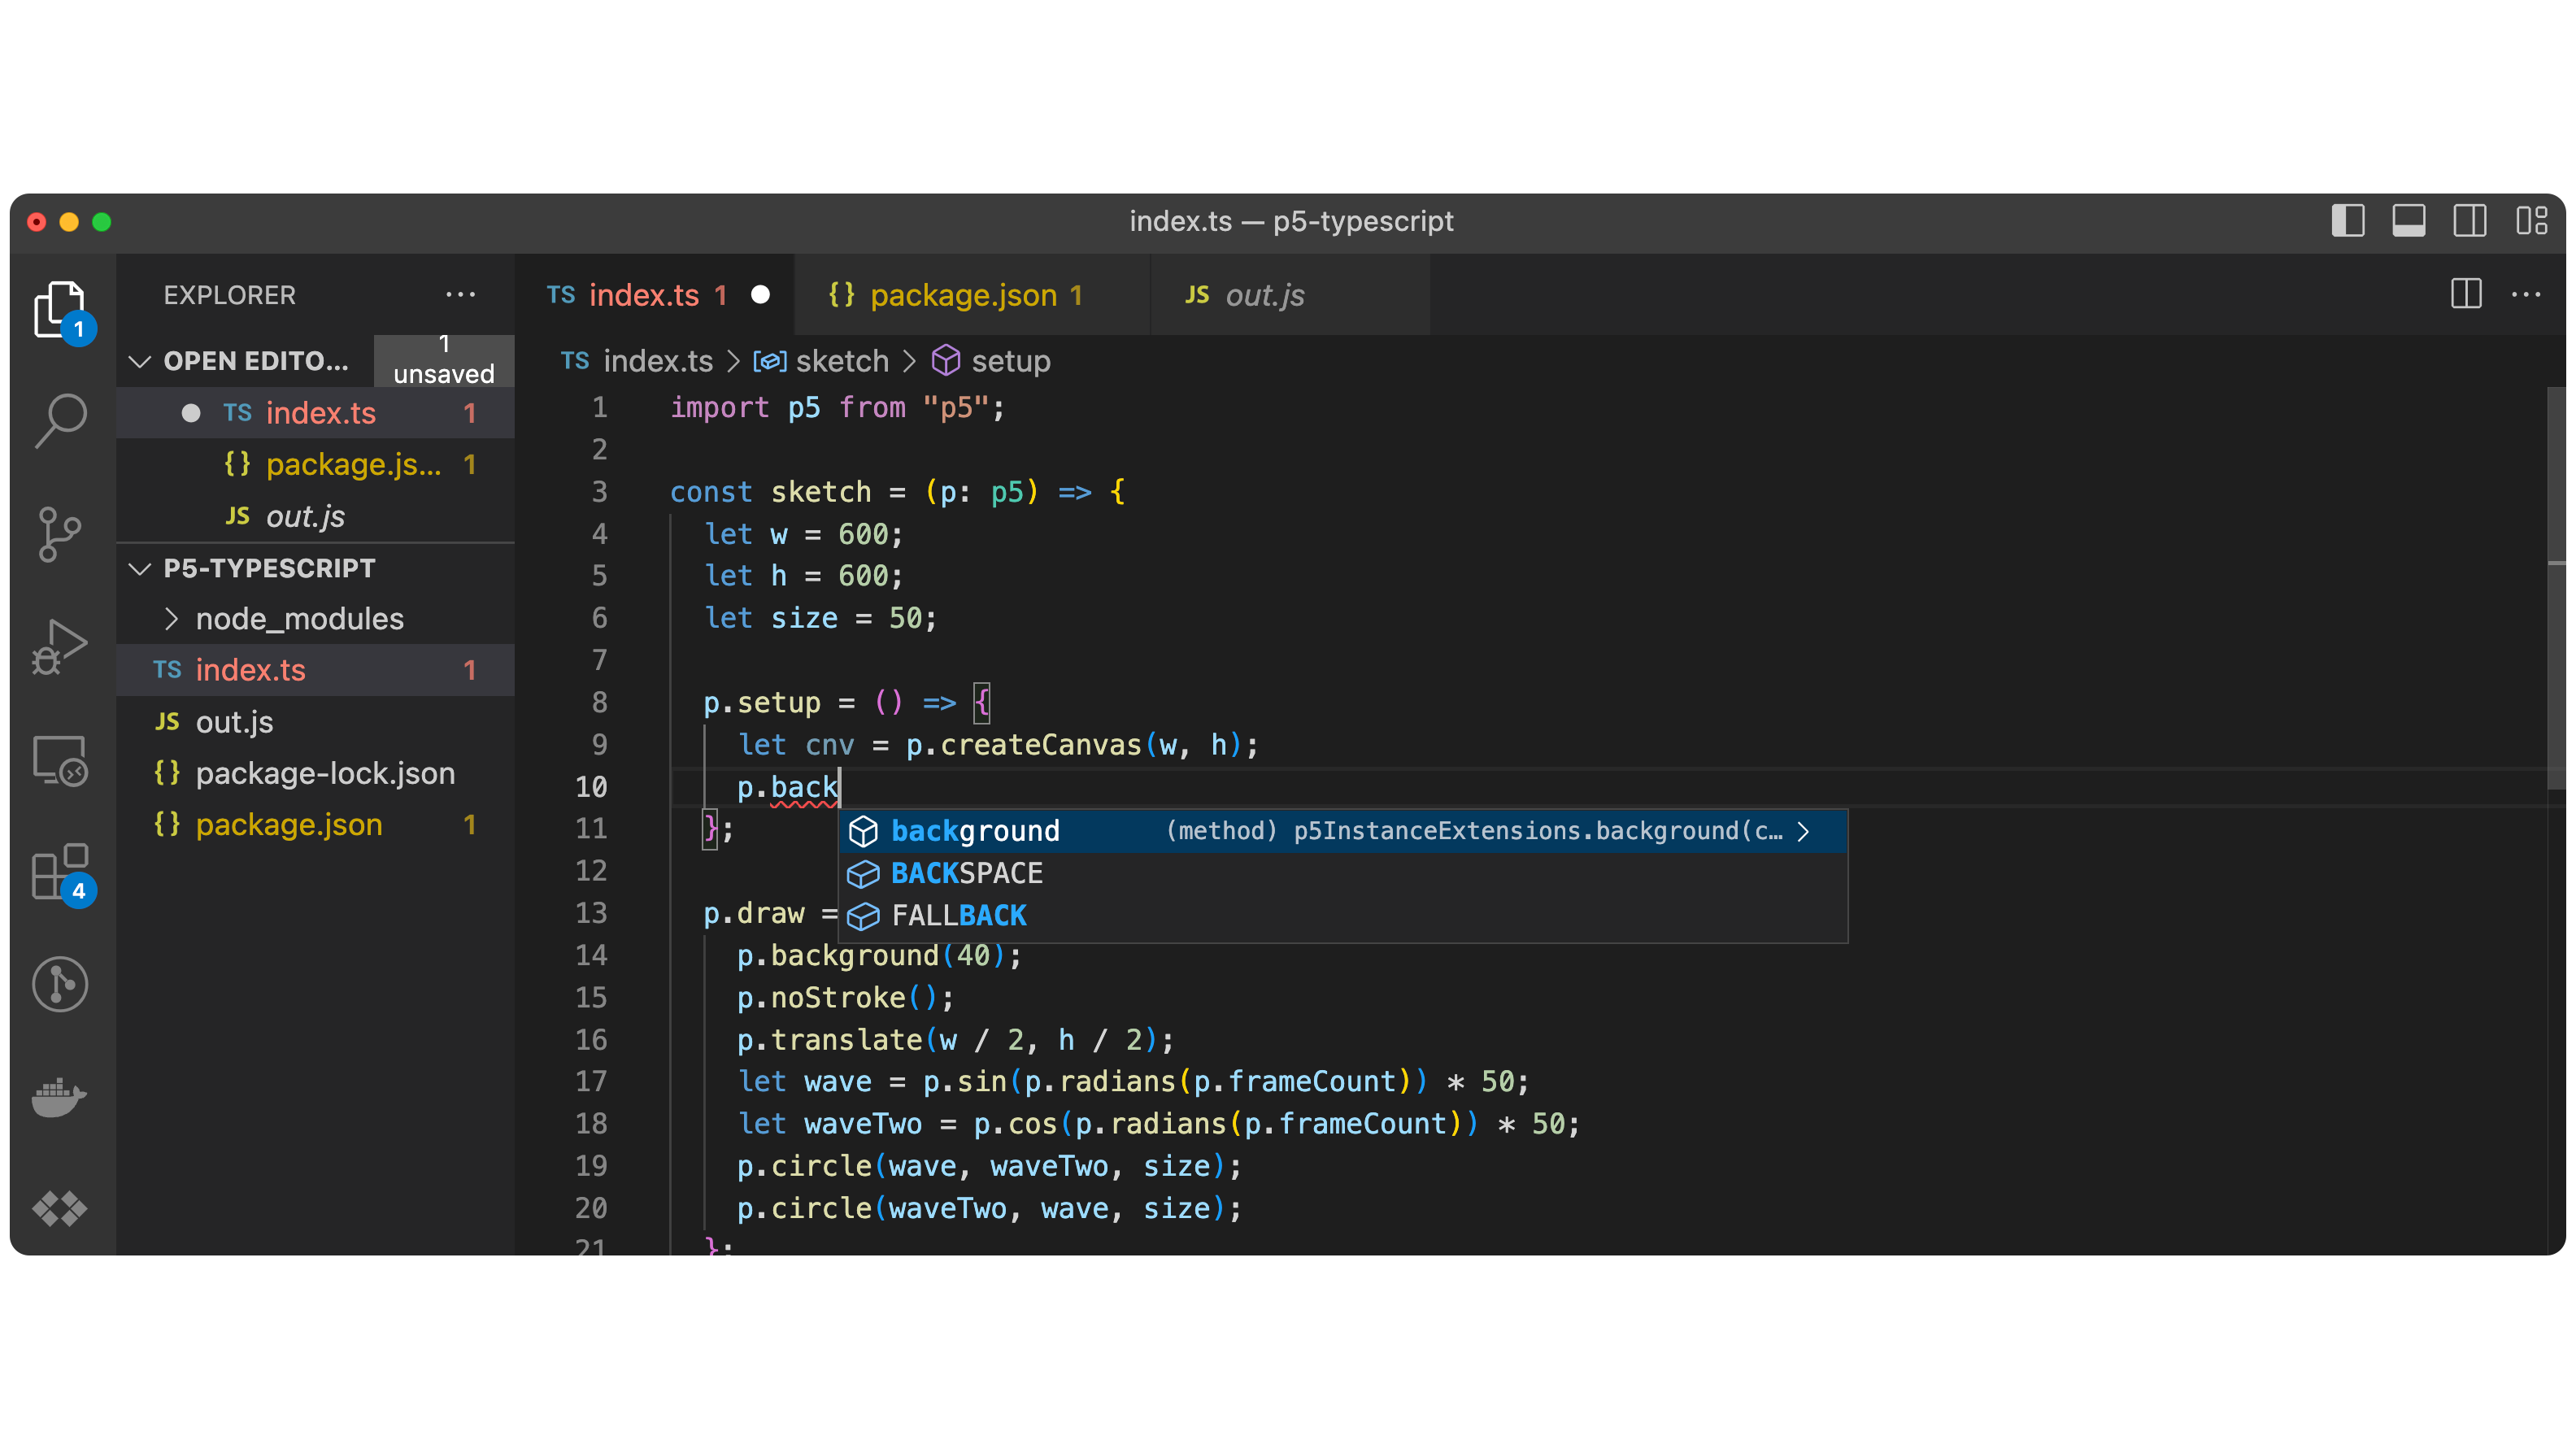
Once we have the types installed, we can add the p5 type annotation to our sketch function parameter (p: p5), and now we have awesome autocomplete! Essentially, we are telling our code that the parameter p is of type ‘p5’. Since we now have the types for p5, Typescript knows all of the properties available on that object.
As you write more Typescript code in your Webflow projects, adhering to types will improve your understanding of Javascript and prevent some common errors, especially with edge cases. I encourage to use it in every project going forward, adopting more and more along the way. Additionally, esbuild has a lot more options we can configure like watch mode, path aliases, and hot reloading, but for now we will finish here.
Also keep in mind that this code still only lives on our local machine! When you want to take your website live, you’ll need to move the compiled javascript back in to Webflow or host it via something like npm or jsDelivr.
If you want a complete environment without all the setup, I highly recommend checking out the Finsweet Developer Starter. It has a lot of additional configuration and developer dependencies, including Webflow types, already installed so you can have a fantastic Typescript developer environment without all the setup. I think it’s important to walk through the setup yourself though in order to understand what all is going on with servers, modules, and bundlers so that you can leverage the pre-built solutions more effectively.